Add a line to the plist using NPCEditor
The first step to make Brad or Rachel say something new is adding the line to the .plist file that NPCEditor uses to store its data.
- Launch NPCEditor using the Launcher:
- Hit Advanced.
- Click on the green arrow in the NPCEditor line in the Agents section.
- Note that the NPCEditor will launch minimized and may be grouped with other Java processes.
- In the NPCEditor, select the Utterances tab. On the right side in the Answers column, click the "Add" button. A new blank line will be created in the list.
- Note that once you make changes, you will be prompted to save the .plist file. It is best to save under a new name. You can disable automatic saving in the Edit menu, Properties.
- Type the dialog you want Brad to say in the text box at the bottom.
- Note that you may need to adjust the GUI to see the correct text field; it's the one right below the buttons. You can ignore the Script section for now.
- Note that while you can paste in text, you need to make sure it doesn't contain any special punctuation marks, such as those found in MS Word or Excel. Typed in punctuation should be fine.
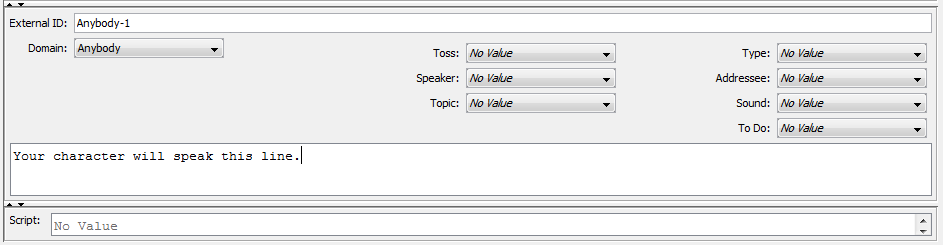
- Fill in the External ID.
- If using prerecorded speech, this should be the audio file name without the extension (i.e. test, not test.wav).
- All External ID's should be unique.
- Fill in the other information:
- 'Domain' is 'General' or whatever domain you want the line to appear in.
- 'Toss' is used for jumping between domains and can be ignored for now.
- 'Type' can be blank or one of the control types.
- 'Speaker' should be 'Brad' or your character's name.
- 'Addressee' should be 'User'
- 'Topic' is not required, but useful for organization.
- 'Sound' is used to sort between prerecorded or TTS lines, set accordingly.
- You may test the line by double-clicking on it in the Answers list, provided the rest of the Toolkit is running.
Add a sound file
If you are using prerecorded speech, you need to place the audio file in the correct folder.
When using Unity, the audio files are kept in \Assets\StreamingAssets\Sounds under each Unity project. Any audio file that Unity can play back can be used. The file name needs to match the External ID used in NPCEditor (see above).
If the audio file cannot be found, the system will try to generate the audio using TTS.
Add lip synching
To generate lip-syncing for the audio file:
- Add the line of text to 00_bradmasterlines.txt in \Assets\StreamingAssets\Sounds
- Run 00_splitmasterlines.bat in the same directory
- Run 00_runvisemeschedulersphinx4.bat in the same directory
See VisemeSchedulerSphinx4 for more details on this tool.
VHBuilder and Character Customizer
To quickly get started in generating dialog and behavior for new characters, please see the documentation on the VHBuilder and Character Customizer tools. These tools can generate simple dialog without needing to use NPCEditor. The introduction movie on the main VHToolkit page as well as some of the Tutorial Videos shows these tools.