Page History
...
- W,A,S,D - camera movement. Q & E - camera up/down
- J - mouse visibility toggle - mouse look mode
- L - toggles the fake recognizer text box
- O - toggles the user's recognized text
- M - toggles speech recognition mode. When on, click and hold and talk in the mic. Release to quit talking.
- X - reset camera
- Z - show debug statistics
- I - Toggles sbm character subtitles
- P - Toggle entire GUI
- Alt-enter - toggle windowed / fullscreen
- Escape - quit
Accessing the Command Console
Use the ~ key to bring up the console.
Using SmartBody Bonebus Mode
Bonebus mode uses Smartbody as a separate process instead of integrated within Unity. This is useful if you have Unity Free since Smartbody uses Unity Plugins which is a Pro only feature.
- If there is a gameobject named "SmartbodyManager" in the hierarchy view, select it and de-active it in the inspector
- While the Toolkit is running, press 'C'
Click 'Launch SB Bonebus' and the SmartBody window will open
Click 'Bonebus Init Scene' and the Characters will re-initialize in bonebus mode
If Unity will not Play because you have Unity Free, then click the SmartbodyManager gameobject and disable it before playing.
Developers
Loading VHToolkit Scene
- Open Unity
- File->Open Project (this may already be done for you if this is the first time you've launched Unity)
- On the Open Project tab, click the Open Other button.
- Navigate to the VHToolkit Unity Project here: <VHToolkit>\core\vhtoolkitUnity
- Click Select Folder
- In the Project column, double click on vhtoolkitScene.
- Click Play
Creating your own Project using the VHToolkit Unity Package
- Open Unity
- File->New Project
- You need 2 Unity Packages to start with. You'll find all packages here: <VHToolkit>\bin\vhtoolkitUnity. Copy them to <your project>\Assets.
- First, is the vhAssets package. This contains common scripts and libraries used in various Virtual Humans applications. There is a different .unitypackage file for each platform.
- vhAssetsPackage.unityPackage (Windows)
- vhAssetsPackageOSX.unityPackage
- vhAssetsPackageIOS.unityPackage
- vhAssetsPackageAndroid.unityPackage
- Second, is the vhAssets Test Scene. This contains assets and scripts that will initialize a very basic test scene environment. This file is: vhAssetsTestScenePackage.unityPackage
- Copy the 2 Unity Packages to this new project.
- In Unity, in the 'Project' column, double click on the 2 Unity Packages.
- Open Scenes->vhAssetsTestScene
- Click Play. The virtual human should be animating in an idle pose. Hit 'C' to show a debug menu. You should be able to control him via the buttons on the debug menu.
Creating your own Virtual Human
Creating your own Virtual Human has different meanings to different groups. Some people want to use the existing characters that we supply, but only change certain features like giving them a different voice, or a different colored shirt. Others groups want to use a different character, but the character was created using a standard character package that we already support (Mixamo, etc). Others want to use a completely different character with a unique skeleton, etc. These instructions will attempt to explain the different features and how to customize based on your needs.
The easiest way to use your own Virtual Human is to create a Unity Project using the included .unitypackages as a starting point. From here, you can add/change features on the default character, or bring in your own and customize using the existing character for reference.
Smartbody initialization
- SmartbodyInit class (Attached to SmartbodyManager gameobject)

- asset paths
- joint mapping
- mapped skeletons/motions
...
- Empty gameobject named 'SoundNode' attached as a child of the character's gameobject
- Attach a Sound Source script to the SoundNode gameobject
- Manually position the SoundNode gameobject where you want the character's speech to originate (eg, his mouth)
Character Configuration
Every character should have a script associated with him which specifies the attributes of the character. This class is derived from the SmartbodyCharacterInit class.It specifies the following parameters
- unityBoneParent
- assetPath
- skeletonName
- voiceType
- voiceCode
- voiceTypeBackup
- voiceCodeBackup
- useVisemeCurves
- startingPosture
The parameters allow us to configure the character correctly with respect to smartbody. Please take a look at the 'InitBrad.cs' file for an example of how to configure the character
Changing the Character Voice
The character can use audio files on a per utterance basis, or it can use a TTS generated voice. If using audio files, the voiceType parameter in the above mentioned configuration will be set to 'audiofile' and the voiceCode parameter will point to the folder containing the sound files for the character.
e.g. in the case of the character Brad, His voice files are under the folder "Sounds". This folder contains the audio files and the corresponding .bml and .xml files which are the lipsynch schedule and the non-verbal behavior respectively.
If you want the character to use the TTS generated voice, you will set the voiceTypeBackup parameter to "remote" and set the voiceCodeBackup parameter to the name of the voice you want to use. The name of this voice can be obtained by looking at the TTSRelay application which prints out the available voices on launching.
When Smartbody cannot find audio files, it defaults to the TTS voice and uses the voice you specified as the characters voice.
Online Motion Retargeting
Smartbody has the capability of online retargeting motions built for one character to another. This can be done in two steps.
- In your Init script, when setting the assetPaths, the first parameter specifies the skeleton the motions belong to. ie in Rachel's InitRachel.cs, there's a line:
assetPaths.Add(new KeyValuePair<string, string>("ChrRachel.sk", "Art/Characters/SB/ChrRachel"));
This says to load all the motions in the ChrRachel folder and assign them to the ChrRachel.sk skeleton.
If you want to retarget Brad's motions to Rachel, you need to add another line:
assetPaths.Add(new KeyValuePair<string, string>("ChrBrad.sk", "Art/Characters/SB/ChrBrad"));
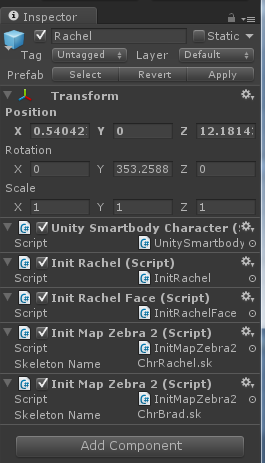
This says the motions in the ChrBrad folder are for the ChrBrad.sk skeleton, and they should be retargeted to ChrRachel.sk. - On the character's gameobject, for each source skeleton that you use for retargeting, you need to set the skeleton mapping on that skeleton. For example, if you look at Rachel's gameobject, you'll see two skeleton mapping components. Each one is a Zebra2 mapping, but one is for ChrRachel.sk and one is for ChrBrad.sk since Rachel uses both ChrRachel and ChrBrad motions.
After doing these two steps, you should be able to use one character's motions on another. In the above example, you should be able to play a motion like ChrBrad@Idle01_ArmStretch01.skm on Rachel, eg:
SmartbodyManager.SBPlayAnim("Rachel", "ChrBrad@Idle01_ArmStretch01.skm");
Using the Console
Hit the ~ key to bring up the console. Here you can see some debug information. Type 'help' for all available commands.
...