Page History
| Table of Contents | ||
|---|---|---|
|
Overview
The vhAssetsPackage vhAssets is a redistributable Unity3D Engine package file that contains functionality for allowing Smartbody and VHMsg to work from within the Unity3D engine.collection of redistributable Unity package files:
- vhAssetsTestScenePackage - sample scene that shows how to setup a SmartBody driven character in Unity. Requires one of the platform packages below.
- vhAssetsPackage - Windows platform specific package
- vhAssetsPackageOSX - Mac OS X platform specific package
- vhAssetsPackageIOS - Apple iOS platform specific package
- vhAssetsPackageAndroid - Android platform specific package
The Toolkit uses Unity as it's primary rendering engine. It can run in Unity Free or Unity Pro. For Unity Free, we interface with Smartbody SmartBody using 'bonebus mode'. For Unity Pro, we access Smartbody SmartBody directly using a .dll.
Some additional functionality Functionality that the vhAssetsPackage contains isprovides:
- An extension of MonoBehaviour that allows order-dependent initialization and updates
- Smartbody SmartBody interface
- VHMsg interface
- VHCL Audio interface
- Asset Post-processors Processors that ease pipeline integration
- Resolution independent UI classes
- Interactive Debug Panel
- Customizable Free Mouse Look
- Ini .ini file configuration
- Loading Screen
- Performance time demo tests
- File Parsing
- Application setup point
- Customizable build process
- Fps FPS and Memory Debug Info
Any of these optional components are available when installing the vhAssetsPackage
Quick facts:
- Shared location: https://svn.ict.usc.edu/svn_vh/trunk/
- Toolkit's vhAssets Package Location: \\vhbuild2\VHToolkit-Builds (sort by Date)
- vhAssets Package Source Location: https://svn.ict.usc.edu/svn_vh/trunk/lib/vhunity
- Project location(s): Toolkit (https://svn.ict.usc.edu/svn_vhtoolkit/trunk)
- Main developers: Ed Fast, Adam Reilly
Unity
Unity is available within ICT. The latest version is available through SVN here:
https://svn.ict.usc.edu/svn_vh/trunk/core/Unity
This location has the latest up-to-date version of Unity, with the documentation pruned for space.
The entire Unity distribution is available here.
https://svn.ict.usc.edu/svn_vh/vendor/unity/current
Also, all previous versions of Unity are tagged in this vendor branch as well.
Please note that you need a Serial # for Unity Pro. Please contact Helpdesk for a Serial #.
For projects, it is recommended to use the version of Unity in SVN. It is virtually the same as installing Unity from the web site*. But you get the bonus of:
...
* The only difference in installing Unity vs using SVN is that certain file associations are not registered (in Windows). So, double-clicking on a .unitypackage will not open it. But right-click->Import New Package works fine.
More internal Unity documentation can be found here: Unity
Using vhAssets
Location
vhAssets is distributed via the vhAssetsPackage.unitypackage. It is built regularly by our build server, so it will always contain the latest code. It can be found, along with all of our other Unity packages here:
\\vhbuild2\VHToolkit-Builds (sort by Date)
The source for this package is stored here at https://svn.ict.usc.edu/svn_vh/trunk/lib/vhunity
First Time Installation
- Bring the .unityPackage file inside of your Unity project Assets folder
- Double click it
- Click Import
- Add all the imported files into svn
...
Through the Unity Editor, many variables of vhAssets script components can be customized
DebugConsole
Captures all Smartbody SmartBody and Unity log ouput and display it to user. Also can be used to send commands. Type '?' for a list of available commands.
| Variable Name | Purpose | Value Range |
|---|---|---|
| Percentage Of Screen | The amount of vertical space that the debug console GUI will span | float 0 - 1 |
FreeMouseLook
| Variable Name | Purpose | Value Range |
|---|---|---|
| Axes | Specifies which axes the camera can rotate around | MouseX, MouseY, MouseXAndY |
| Sensitivity X/Y | Angular velocity for camera rotation | float |
| Movement Speed | Linear velocity for camera movement | float |
| Secondary Movement | Linear velocity for camera movement when holding the left shift key | float |
| Maximum X//Y | Max angle the camera can rotate on an axis before being clamped | -360 to +360 |
| Minimum X/Y | Min angle the camera can rotate on an axis before being clamped | -360 to +360 |
| Camera Rotation On | Enables/Disables camera rotation from mouse movement: True or False | True/False |
| Move Keys | Allows specification for which keys are used to make the camera move up, down, left, right, forward, backward, and toggle rotation on/off | KeyCode |
Loading Screen
Provides functionality for full screen image
VHBehaviour
Allows for control of the call ordering of all MonoBehaviour messages sent from Unity.
| Variable Name | Purpose | Value Range |
|---|---|---|
| Initial Priority | The ordering in which this script will be called compared to other VHBehaviours. A lower number entails a higher priority. i.e. priority 0 behaviours get processed before priority 10 behaviours | int |
VHBehaviourManager
The control system that allows for correct processing order of VHBehaviours. This object MUST be present in order for VHBehaviours to work
VHWayPointNavigator
| Variable Name | Purpose | Value Range |
|---|---|---|
| Speed | Linear movement rate at which you move between waypoints | float |
| Turn Towards Target | Turn to face your next waypoint target. | True/False |
| Ignore Height | Only move to next waypoint along the x/z axes | True/False |
| Immediately Start Pathing | Start Pathing: As soon as the scene starts, start moving | True/False |
| Loop Type | Action to take upon reaching the last way point of the path | Loop, Ping Pong, Stop |
| Pather | The gameobject that will do the moving | GameObject |
| WayPoints | The list of transforms that will be used as waypoints for the pather to move along | GameObject |
VHTimeDemo
Works with VHWayPointNavigator and FpsCounter to track performance along a specified path in the scene and then uploads fps/performance data to a database
| Variable Name | Purpose | Value Range |
|---|---|---|
| Time Demo Name | Identifying name of this time demo. Used for starting a specific time demo through the console or command line | string |
| Performance Log Name | The filename for the output log from unity's performance tracking | string |
| Project Name | Specifies the project this demo is used for | string |
| Time Demo Length | The amount of time it will take for the time demo to complete once started | positive float |
| Fps Sampling Rate | How often the fps will be sampled during the time demo | positive float |
...
SmartBodyManager
Interfaces with smartbodySmartBody.dll to provide smartbody SmartBody character animation to unity
| Variable Name | Purpose | Value Range |
|---|---|---|
| Path To SBM Files | The directory in which smartbody SmartBody should look for initialization files. Starting directory is the current unity project folder | string |
| Character Load Path | Project subdirectory in which character prefabs should be instantiated from | string |
| Position Scale | Units of measurement between smartbody SmartBody and unity can sometimes be different based on how the art was exported. If there is a difference, it can be mitigated with this variable | positive float |
| Display Log Messages | Toggle for allowing smartbody SmartBody LOGs to be output to unity. | True/False |
| All Facebone Characters | Toggle for making all unity smartbody SmartBody driven characters facebone drive or not | True/False |
| Cam Settings | Used for the SBMonitor to duplicate the renderer viewport and camera | positive float |
| Initial VHMsgs to Send | VHMsgs that will get sent as soon as smartbody SmartBody is initialized | string |
...
UnitySmartBodyCharacter
Works with SmartbodyManager SmartBodyManager to have a smartbody SmartBody driven character inside of unity
| Variable Name | Purpose | Value Range |
|---|---|---|
| Bone Parent Name | Child gameobject name path that will lead to the skeleton root | string |
| Is Face Bone Driven: | Toggle that informs smartbody SmartBody whether or not this character is face bone driven | True/False |
VHMsgManager
Interfaces with VHMsg that allows communication via strings between processes
| Variable Name | Purpose | Value Range |
|---|---|---|
| Use Specified Host and Port | If checked, the Host and Port specified will be used on connection, otherwise localhost and 61611 will be used | True/False |
| Host | Host to connect to | string |
| Port | Port to connect to | positive int |
Developers
All vhAssets code can be modified directly in the repository https://svn.ict.usc.edu/svn_vh/trunk/lib/vhunity/vhAssets
Loading vhAssets Scene
- Open Unity
- File->Open Project (this may already be done for you if this is the first time you've launched Unity)
- On the Open Project tab, click the Open Other button.
- Navigate to the vhAssets Unity Project here: <VHToolkit>\lib\vhunity\vhAssets
- Click Select Folder
- In the Project column, double click on vhAssetsTestScene.
- Click Play
Creating your own Project using the vhAssets Unity Package
- Open Unity
- File->New Project
- You need 2 Unity Packages to start with. You'll find all packages here: <VHToolkit>\bin\vhAssets. Copy them to <your project>\Assets.
- First, is the vhAssets package. This contains common scripts and libraries used in various Virtual Humans applications. There is a different .unitypackage file for each platform.
- vhAssetsPackage.unityPackage (Windows)
- vhAssetsPackageOSX.unityPackage
- vhAssetsPackageIOS.unityPackage
- vhAssetsPackageAndroid.unityPackage
- Second, is the vhAssets Test Scene. This contains assets and scripts that will initialize a very basic test scene environment. This file is: vhAssetsTestScenePackage.unityPackage
- Copy the 2 Unity Packages to this new project.
- In Unity, in the 'Project' column, double click on the 2 Unity Packages.
- Open Scenes->vhAssetsTestScene
- Click Play. The virtual human should be animating in an idle pose. Hit 'C' to show a debug menu. You should be able to control him via the buttons on the debug menu.
Creating your own Virtual Human (Smartbody)
Creating your own Virtual Human has different meanings to different groups. Some people want to use the existing characters that we supply, but only change certain features like giving them a different voice, or a different colored shirt. Others groups want to use a different character, but the character was created using a standard character package that we already support (Mixamo, etc). Others want to use a completely different character with a unique skeleton, etc. These instructions will attempt to explain the different features and how to customize based on your needs.
The easiest way to use your own Virtual Human is to create a Unity Project using the included .unitypackages as a starting point. From here, you can add/change features on the default character, or bring in your own and customize using the existing character for reference.
Smartbody initialization
- SmartbodyInit class (Attached to SmartbodyManager gameobject)
- asset paths
- joint mapping
- mapped skeletons/motions
- SmartbodyCharacterInit class (Attached to each character gameobject)
- skeleton name (.sk)
- voice type (prerecorded audio or tts)
- voice "code" (path to audio files or tts voice name)
- backup voice type and backup "code" (if prerecorded audio file is not found, you can use TTS as a backup)
- starting posture
- locomotion information
- SmartbodyFaceDefinition class (Attached to each character gameobject)
- defines visemes and facial expressions for the character.
- visemes and facial expression are single pose animations (.skm) for doing blended lip-sync and expressions.
- neutral pose, action units and visemes
- SoundNode gameobject
- Empty gameobject named 'SoundNode' attached as a child of the character's gameobject
- Attach a Sound Source script to the SoundNode gameobject
- Manually position the SoundNode gameobject where you want the character's speech to originate (eg, his mouth)
Character Configuration
Every character should have a script associated with him which specifies the attributes of the character. This class is derived from the SmartbodyCharacterInit class.It specifies the following parameters
- unityBoneParent
- assetPath
- skeletonName
- voiceType
- voiceCode
- voiceTypeBackup
- voiceCodeBackup
- useVisemeCurves
- startingPosture
The parameters allow us to configure the character correctly with respect to smartbody. Please take a look at the 'InitBrad.cs' file for an example of how to configure the character
Changing the Character Voice
The character can use audio files on a per utterance basis, or it can use a TTS generated voice. If using audio files, the voiceType parameter in the above mentioned configuration will be set to 'audiofile' and the voiceCode parameter will point to the folder containing the sound files for the character.
e.g. in the case of the character Brad, His voice files are under the folder "Sounds". This folder contains the audio files and the corresponding .bml and .xml files which are the lipsynch schedule and the non-verbal behavior respectively.
If you want the character to use the TTS generated voice, you will set the voiceTypeBackup parameter to "remote" and set the voiceCodeBackup parameter to the name of the voice you want to use. The name of this voice can be obtained by looking at the TTSRelay application which prints out the available voices on launching.
When Smartbody cannot find audio files, it defaults to the TTS voice and uses the voice you specified as the characters voice.
Online Motion Retargeting
Smartbody has the capability of online retargeting motions built for one character to another. This can be done in two steps.
- In your Init script, when setting the assetPaths, the first parameter specifies the skeleton the motions belong to. ie in Rachel's InitRachel.cs, there's a line:
assetPaths.Add(new KeyValuePair<string, string>("ChrRachel.sk", "Art/Characters/SB/ChrRachel"));
This says to load all the motions in the ChrRachel folder and assign them to the ChrRachel.sk skeleton.
If you want to retarget Brad's motions to Rachel, you need to add another line:
assetPaths.Add(new KeyValuePair<string, string>("ChrBrad.sk", "Art/Characters/SB/ChrBrad"));
This says the motions in the ChrBrad folder are for the ChrBrad.sk skeleton, and they should be retargeted to ChrRachel.sk. - On the character's gameobject, for each source skeleton that you use for retargeting, you need to set the skeleton mapping on that skeleton. For example, if you look at Rachel's gameobject, you'll see two skeleton mapping components. Each one is a Zebra2 mapping, but one is for ChrRachel.sk and one is for ChrBrad.sk since Rachel uses both ChrRachel and ChrBrad motions.
After doing these two steps, you should be able to use one character's motions on another. In the above example, you should be able to play a motion like ChrBrad@Idle01_ArmStretch01.skm on Rachel, eg:
SmartbodyManager.SBPlayAnim("Rachel", "ChrBrad@Idle01_ArmStretch01.skm");
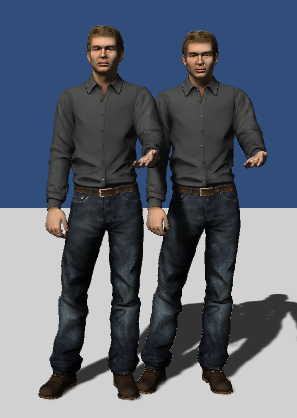
Creating your own Virtual Human (Mecanim)
A new scene entitled "mecanim" has been added to the vhAssets package which displays 2 of the Brad character, one driven by the Smartbody animation system and the other by Unity's Mecanim animation system. This scene is currently in development but can be used as a guide for how to setup a mecanim character. This scene needs to be loaded through the MainMenu scene to work properly. Alternatively, you can manually activate the SmartbodyManager, VHMsgManager, and DebugConsole objects.
Setup
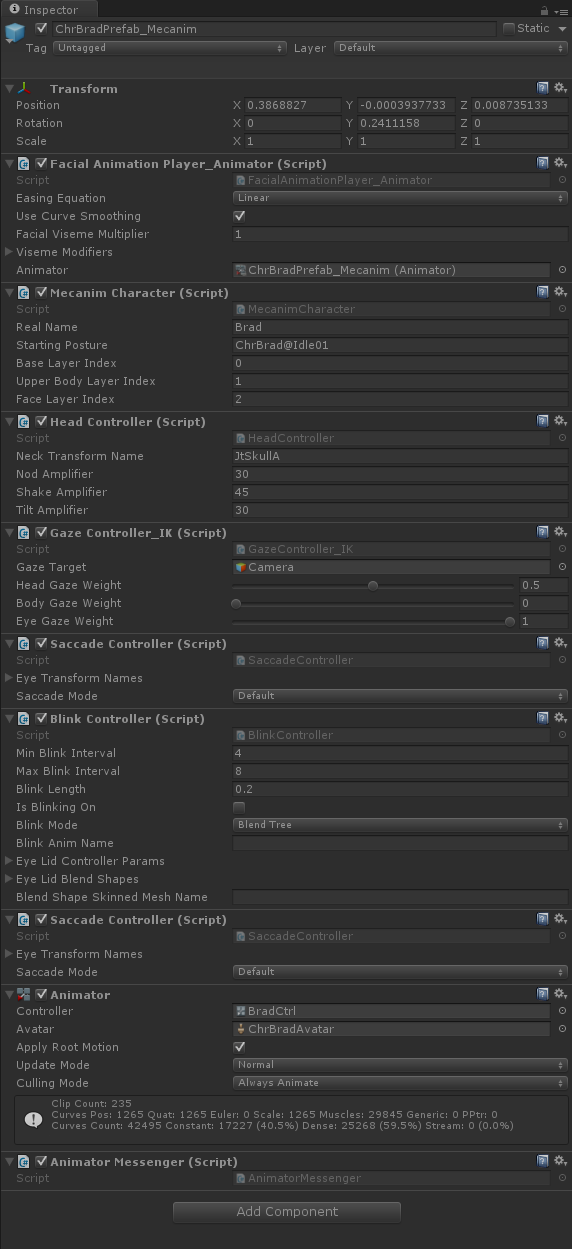
Select a gameobject and add the MecanimCharacter component to it. By adding this one component, other components required to make the character nod, blink, gaze, etc will automatically be added. Make sure there is a gameobject with the MecanimManager component in the scene as well.
For an example of how to setup a mecanim driven character, click on the gameobject ChrBradPrefab_Mecanim in the mecanim scene. Also add a child game object called "SoundNode" and attach an audio source to it. Again, see ChrBradPrefab_Mecanim as a reference.
Testing
Use the UI menu on the left side of the screen to test animations, nods, gazes, saccades, and lip sync.
Mecanim Help
For information on Mecanim, please visit Unity's documentation http://docs.unity3d.com/Manual/AnimationOverview.htmlHere are some examples for common functionality that is modified on a per project basis
DebugConsole
Add a new command callback for an arbitrary command
| Code Block | |
|---|---|
| |
| |
m_Console.AddCommandCallback("some_command", new DebugConsole.ConsoleCallback(HandleConsoleMessage)); void HandleConsoleMessage(string commandEntered, DebugConsole console){ if { if (commandEntered.IndexOf("some_command") != -1) // Do Something }} |
To use the console, at run-time hit the ~ key. Type '?' and hit enter to see a list of commands. If you used the code above in your script, you should see "some_command" in the list. Note, you can pass additional arguments with these commands.
Send arguments with a command while typing in the console
| Infocode |
|---|
vhmsg someMessage |
VHMsgManager
Subscribe to a certain type of message
| Code Block | |
|---|---|
| |
| |
vhmsg.SubscribeMessage("someMessage"); |
Subscribe to all vhmsgs
| Infocode |
|---|
vhmsg.SubscribeMessage("*"); |
Send a vhmsg
| Infocode |
|---|
vhmsg.SendVHMsg("someMessage someParam1"); |
Handle a message
| Code Blockinfo | ||
|---|---|---|
| ||
vhmsg.AddMessageEventHandler(new VHMsgBase.MessageEventHandler(VHMsg_MessageEvent)); void VHMsg_MessageEvent(object sender, VHMsgBase.Message message){ string { string [] splitargs = message.s.Split( " ".ToCharArray() );if if (splitargs[0] == "someMessage") // Do Something } |
Build Process
You can customize the build process by creating and modifying a BuildSettings.xml file.
- Inside the assets folder in your unity project, create a file called BuildSettings.xml
In the same folder as the Assets folder within your Unity project create a .bat file with the following lines
Infocode @setlocalset PROJECTPATH=%CD%
pushd ..\Unity
call runEditorBatch.bat -projectPath %PROJECTPATH% -batchmode -nographics -quit -executeMethod UnityStartup.PerformWindowsBuild
popd
@endlocal
Use the following template for custom modification
Code Block language html/xml <?xml version="1.0" encoding="utf-8"?>
<BuildSettings xmlns:xsi="http://www.w3.org/2001/XMLSchema-instance" xmlns:xsd="http://www.w3.org/2001/XMLSchema" xmlns="http://www.cpandl.com">
<ExternalAssetsPaths>
  <ExternalAssetsPaths>
    <string>Assets/SomeDirectory</string>
<string>Assets<string>Assets/SomeOtherDirectory</string>
</ExternalAssetsPaths>
<BuildOutputPath>Builds/YourProject/YourProject.exe</BuildOutputPath>
<PostBuildScript>somePostBuildScript.bat</PostBuildScript>
<ConfigFiles>
  <ConfigFiles>
    <string>Assets/config.ini</string>
</ConfigFiles>
</BuildSettings>
BuildSettings.xml Format
| Field | Desrcription |
|---|---|
| ExternalAssetsPaths | Array of folder names that will be copied to the BuildOutputPath. (OPTIONAL) |
| BuildOutputPath | Path specifying the name and location of the .exe for your build (REQUIRED) |
| PostBuildScript | A .bat or .exe that will be run after the build process is completed. (OPTIONAL) |
| ConfigFiles | Array of file names taht will be copied to the BuildOutputPath. (OPTIONAL) |
Config File Parsing
You can create a config .ini file in your project and read it using the IniParser class
| Code Blockinfo | ||
|---|---|---|
| ||
m_ConfigFile = new IniParser(configFileName); m_ConfigFile.GetSetting("SomeSetting") // returns a string with the value of that setting, if it exists |
Known Issues
FAQ