Overview
The Machinima Maker allows users to easily and rapidly create complex cutscenes and vignettes from within the Unity Engine. Cutscenes contain individual events on a timeline that are invoked when the cutscene is played. These events can have any number of effects, from activating a game object in the unity scene to sending bml and locomotion commands to SmartBody. Many common events are provided out of the box, however custom events are allowed because almost any function written in a C# script can be invoked from the Machinima Maker.
Quick facts:
- Language: C#
- Distribution: Part of the vhAssetsPackage
- Platform(s): Unity

Users
Starting the Machinima Maker
The Machinima Maker is part of the vhAssets package. It is loaded from inside of unity by clicking the "VH" menu on the menu toolbar and then clicking "Machinima Maker"
Creating a Cutscene
If you have no previous cutscenes in the unity scene, then when you load the Machinima Maker window, there will be 1 single button that says "Add Cutscene."

If you have previous cutscenes in the scene, you can add a new cutscene by clicking the '+' button next to the word "cutscene"

Adding/Removing Tracks
Click the - or + sign next to the "Track" text at the top center of the window. You can also right click in the area of the window where the track names are listed. Double clicking on track names allows you to rename them. Right clicking on track names allows you to add child groups.

Creating Events
There are 3 ways to create new events for a cutscene
- Right click on the track area and select "Add Event"
- Ctrl + Left click on the track area
- Click the little "E" button then left click anywhere in the track area
Moving Events
First select an event that you want to move by left clicking on it. You can now drag that event up and down to different tracks and left and right to change it's starting time. The keyboard arrows can also be used to move an event.
Modifying Events
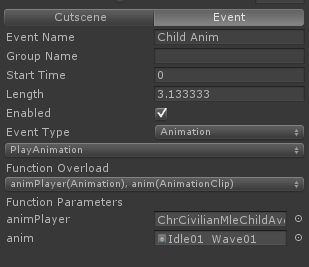
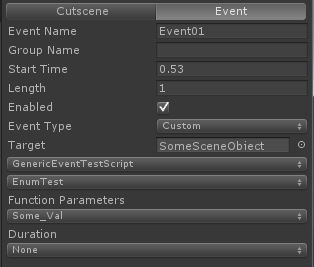
Upon selecting an event with left click, you have access to the "Event" tab on the user interface. Here you can set event properties such as event name, start time, and event type. The event type is a category (such as Audio or SmartBody) that provides access to functionality that is inherent to the type (like playing a sound or using locomotion, respectively). Event types provide easy access to this functionality.
Once the event type is selected, choose the functionality that you want the event to perform when invoked. Once chosen, make sure you fill out the required parameters listed below the selected type.
Setting Up Custom Events
With custom events, you project specific functions can be written and invoked through an event in the machinima maker. To set up a custom event:
- Select an event and change the event type to custom
- Drag the game object in the scene into the "Target" field
- On the drop down menu, select the component that has the function that you want to invoke
- On the next drop down menu, select the function that you want to invoke
- Fill out the required function parameters
Playing/Pausing/Stopping a Cutscene
Press the play button to start a cutscene 
While a cutscene is playing, you can pause it by pressing the same button 
To stop a cutscene completely, reset all data, and reset the timer press 
Automatically Playing Cutscenes
Attach the CutsceneManager script to any game object in your scene and make sure "Auto Play Cutscenes" is checked. When the unity scene starts, all cutscenes will play based on the start time that is listed under the cutscene tab. See Modifying Cutscene Data
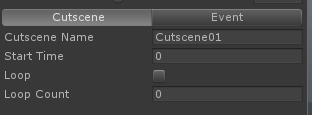
Modifying Cutscene Data
You can change cutscene data such as its name, number of times to play, and start time under the "Cutscene" tab
Event Types
Animation
These events are related to Unity's animation system (not Smartbody's). If you want to play Smartbody driven animations, use the PlayAnim event under the Smartbody event Category.
| Event Type | Purpose |
|---|---|
| Play Animation | Plays a Unity animation using the Unity Animator component. |
Play Animation Queued | Queues the provided animation to play after the current animation is finished playing using the Unity Animator component. |
| Set Speed | Sets the play speed of the animation currently being played on the provided Animator component. |
| Stop Animation | Stops the currently playing animation on the provided Animator component. |
Audio
These events are related to Unity's Audio Source component. If you want Smartbody character lip sync with audio, use the PlayAudio event under the Smartbody Category.
| Event Type | Purpose |
|---|---|
| Play Sound | Uses the Unity Audio Source component to play the specified audio clip. |
| Set Pitch | Sets the pitch level of the specified Audio Source. |
| Set Priority | Sets the priority level of the specified Audio Source. |
| Set Volume | Sets the volume level of the specified Audio Source. |
| Stop Sound | Stops playing the current audio clip on the specified audio source. |
Camera
Camera events are related to the Unity Camera component
| Event Type | Purpose |
|---|---|
| Set Camera Depth | Sets the camera draw ordering when multiple cameras are used in the scene. The lower the number, the higher the priority. |
| Set Field of View | Changes the field of view for the specified perspective camera. |
| Switch Cameras | Switches the current camera view to the specified camera. |
Common
Renderer
| Event Type | Purpose |
|---|---|
Smartbody
These events are for controlling Smartbody and Smartbody driven characters.
| Event Type | Purpose |
|---|---|
| Express | Sends out a vrExpress message. This can be used to play audio with lip sync |
| Gaze | Specifies a Smartbody driven character to look at a pawn or another character. |
| Move Character | Forces a character to start Smartbody driven locomotion. |
| Nod | Starts a head nod animation on the specified character. |
| Play Anim | Starts a Smartbody driven animation on the specified Smartbody character. Note: the animation to play must be an .skm file. |
| Play Audio | Plays audio using an audio source and also uses lip sync. |
Play FAC | |
| Play XML | Forces Smartbody to read the specified bml file and interpret it's associated .bml file and audio file in order to play audio and perform lip sync. |
| Posture | Sets the specified Smartbody character into the specified posture. Note: the posture must be an .skm file. |
| Python Command | Issues any arbitrary python command to SmartBody. |
| Rotate | Sets the yaw, pitch, and roll of the specified character. |
| Run Python Script | Forces Smartbody to open the specified python file and run it. |
| Shake | Starts a head shake animation on the specified character. |
| State Change | |
| Transform | Moves the specified character to the specified world x, y, z location. |
| Walk Immediate | |
| Walk To | Forces the specified character to start walking towards the another character or pawn. |
Timed
Timed events are interpolated over a period of time rather than being "Fire and Forget." The amount of time over which they occur is variables
| Event Type | Purpose |
|---|---|
| Fade Audio | |
| Fade GUI Texture | |
| Fade Light | |
| Fade Renderer | |
| Follow Curve | |
| Rotate | |
| Scale | |
| Translate |
Developers
Creating New Event Types
In order to create your down event type category in the drop down selector, do the following:
- Create a new C# class and derive it from GenericEvents
- Override the GetEventType() method to return the name category of events that this class will hold. This is the name that will appear in the drop down selector on the gui.
- Inside your class, create nested classes that derive from ICutsceneEventInterface. These classes will contain the functionality that is run when the event is invoked.
- Inside each individual nested class, create 1 or more function overloads. You can call these functions whatever you like and they will be displayed on the gui when this event category is chosen.
- Attach this C# script to the "GenericEvents" game object which is nested below the cutscene game object that you were working on
- You should now see your new event type and the functionality that can be invoked from it on the gui. If you don't close the Machinima Maker and re-open it.
public class MyProjectSpecificGenericEvents : GenericEvents {
	public override string GetEventType() { return "This is the name that displays in the event type drop down gui"; }

	public class MyProjectSpecificGenericEvent_SomethingAwesome : CommonEvent_Base {
        public void DoSomethingAwesome(GameObject go) {
            // write your code
        }

		// this is a 2nd overload of the function (not necessary to have multiple overloads, but this shows how)
		public void DoSomethingAwesome(GameObject go, float f) {}
    }
}
Creating Custom Functions
If you simply want to invoke a project specific function and you don't want to go through the steps involved in created new event types, then you can simple write a function in any C# script and select the "Custom" event type on the gui for the selected event.
Custom functions have a few rules:
- No return value is allowed
- No ref or out parameters
- No array, list, dictionary, or other collection types
Follow these above rules and everything will work.
void CustomFunction(string output, int i, float f, Vector2 v2, Vector3 v3, Color col, bool b, Transform trans, GameObject obj) {}
Known Issues
Rewind doesn't always work.
Stopping a cutscene in the middle of a character playing a smartbody animation will not cancel the animation.
FAQ
Link to the appropriate section in the main FAQ page.